Curso de Pascal. Fuentes de ejemplo - Rotaciones 3D.
En el tema de "Gráficos sin BGI" hemos visto por encima cómo hacer rotaciones en el plano.Como eso de los gráficos es una de las cosas más vistosas que se pueden hacer con un ordenador, especialmente cuando se trata de 3 dimensiones, vamos a profundizar un poco más, y a poner un par de ejemplos.
Las rotaciones son sencillas cuando se tiene una cierta base de álgebra de matrices, y no tanto si no es el caso. De cualquier modo, podemos usar las formulitas "tal cual", sin saber cómo trabajan.
Para girar en torno al eje X, la matriz de rotación es:
¦ 1 0 0 ¦
donde sx es el seno del ángulo que se rota
¦ 0 cx sx ¦
y cx es su coseno.
¦ 0 -sx cx ¦
Si esto lo convertimos a formulitas
x = x
y = (y * cx) - (z * sx)
z = (y * sx) + (z * cx)
De forma similar, en torno al eje Y tenemos:
¦ cy 0 -sy ¦
igualmente, sy y cy son seno y coseno del
¦ 0 1 0 ¦
ángulo girado
¦ sy 0 cy ¦
que queda como
x = (x * cy) + (z * sx)
y = y
z = (z * cy) - (x * sy)
Y alrededor del eje Z:
¦ cz sz 0 ¦
cz y sz son... ¡ lo de siempre !
¦ -sz cz 0 ¦
¦ 0 0 1 ¦
que queda como
x = (x * cz) - (y * sz)
y = (x * sz) + (y * cz)
z = z
(esta última es la rotación en el plano que habíamos
visto).
Hay autores que usan estos 3 grupos de fórmulas de forma independiente, y hay quien prefiere multiplicar las tres matrices para obtener la que sería la "matriz de giro" de un punto cualquiera, que queda algo así
¦ (cz*cy)+(sz*sx*sy) (cy*-sz)+(cz*sx*sy)
(cx*sy) ¦
¦
¦
¦ (sz*cx)
(cz*cx)
(-sx) ¦
¦
¦
¦ (-sy*cz)+(sz*sx*cy) (sz*sy)+(cz*sx*cy)
(cx*cy) ¦
En cualquier caso, vamos a dejarnos de rollos y a ver un par de ejemplos
de aplicación de esto.
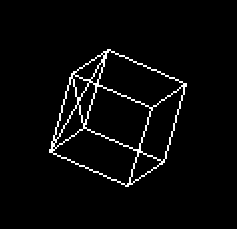
El primero está basado en un fuente de Peter M. Gruhn, que es
muy fácil de seguir, porque la parte encargada de las rotaciones
sigue claramente los 3 grupos de fórmulas anteriores. El resto
es la definición de la figura, las rutinas para dibujar un punto
o una línea (que ya hemos visto) y poco más. Allá
va:
{--------------------------}
{  Ejemplo en Pascal:      }
{                          }
{    Rotar un cubo en 3D   }
{    ROTACUBO.PAS          }
{                          }
{  Este fuente procede de  }
{  CUPAS, curso de Pascal  }
{  por Nacho Cabanes       }
{                          }
{  Comprobado con:         }
{    - Turbo Pascal 7.0    }
{--------------------------}

program RotaCubo;
{$G+}
{
  Basado en un fuente de Dominio Público, por
  Peter M. Gruhn 1993

  El original se puede encontrar en los SWAG

  Modificaciones por Nacho Cabanes, 1996:
  - Modo 320x200x256, sin BGI (usa algoritmo de Bresenham para dibujar
    líneas y sincroniza con el barrido de la VGA).
  - Emplea algo de ensamblador (ver Ampliación 5)
  - El cubo se mueve sólo.


Posibles mejoras (muchas, sólo pongo algunas como ejemplo):
  - Emplear aritmética entera, y tablas de senos y cosenos para
    mayor velocidad, aunque en este caso no es necesario, porque
    se rotan muy pocos puntos.
  - Que las rotaciones no sean aditivas (se vuelva a rotar a partir
    del original, no de la figura ya rotada, para que los errores no
    se vayan sumando).
  - Más flexibilidad: definir las líneas a partir de sus dos vértices
    en vez de crear las figuras "a pelo".
  - Definir caras 3D para dibujar figuras sólidas.
}

uses
  crt;

const
  gradRad = 1 {grados} * 3.1415926535 {radianes} / 180 {por grado};
  { Convierte un grado a radianes (sin y cos usan radianes) }

type
  punto = record   { Punto en 3d }
    x, y, z : real;
  end;

var
  img : array [0..7] of punto;   { Nuestra imagen tendrá 8 puntos }
  tecla: char;
  color: byte;


procedure retrace; assembler;   { Espera el barrido de la pantalla }
asm
  mov dx,3dah
 @vert1:
  in al,dx
  test al,8
  jz @vert1
 @vert2:
  in al,dx
  test al,8
  jnz @vert2
end;


procedure init;     { Inicializa }
begin
  asm
    mov ax, $13     { Modo 320x200x256 }
    int $10
  end;
  { Datos de la imagen }
  img[0].x := -35;  img[0].y := -35;  img[0].z := -35;
  img[1].x := 35;   img[1].y := -35;  img[1].z := -35;
  img[2].x := 35;   img[2].y := 35;   img[2].z := -35;
  img[3].x := -35;  img[3].y := 35;   img[3].z := -35;
  img[4].x := -35;  img[4].y := -35;  img[4].z := 35;
  img[5].x := 35;   img[5].y := -35;  img[5].z := 35;
  img[6].x := 35;   img[6].y := 35;   img[6].z := 35;
  img[7].x := -35;  img[7].y := 35;   img[7].z := 35;
end;


Procedure Ponpixel (X,Y : Integer; Col : Byte); assembler;
  { Dibuja un punto en la pantalla gráfica, en 320x200x256 }
  Asm
    mov     ax,$A000
    mov     es,ax
    mov     bx,[X]
    mov     dx,[Y]
    mov     di,bx
    mov     bx, dx                  { bx = dx }
    shl     dx, 8                   { dx = dx * 256 }
    shl     bx, 6                   { bx = bx * 64 }
    add     dx, bx                  { dx = dx + bx (= y*320) }
    add     di, dx                  { Posición final }
    mov     al, [Col]
    stosb
end;


procedure LineaB(x, y, x2, y2 : word; color: byte);
{ Dibuja una línea, basado en el algoritmo de Bresenham }
{ Original de Sean Palmer; una pequeña corrección por Nacho Cabanes }
var
 d,
 dx, dy,             { Salto total según x e y }
 ai, bi,
 xi, yi              { Incrementos: +1 ó -1, según se recorra }
         : integer;
begin
 if (x=x2) and (y=y2) then  { Corrige un fallo: si es un sólo punto }
   begin                    { el algoritmo (tal y como era) falla }
   PonPixel(x,y,color);
   exit;
   end;
 if (x < x2) then    { Si las componentes X están ordenadas }
 begin
   xi := 1;          { Incremento +1 }
   dx := x2 - x;     { Espacio total en x }
 end
 else                { Si no están ordenadas }
 begin
   xi := - 1;        { Increm. -1 (hacia atrás) }
   dx := x - x2;     { y salto al revés (negativo) }
 end;
 if (y < y2) then    { Análogo para las componentes Y }
 begin
   yi := 1;
   dy := y2 - y;
 end
 else
 begin
   yi := - 1;
   dy := y - y2;
 end;
 PonPixel(x, y,color);   { Dibujamos el primer punto }
 if dx > dy then         { Si hay más salto según x que según y }
 begin                   { (recta más cerca de la horizontal) }
   ai := (dy - dx) * 2;   { Variables auxiliares del algoritmo }
   bi := dy * 2;          { ai y bi no varían; d comprueba cuando }
   d  := bi - dx;         { debe cambiar la coordenada y }
   repeat
     if (d >= 0) then     { Comprueba si hay que avanzar según y }
     begin
       y := y + yi;       { Incrementamos Y (+1 ó -1) }
       d := d + ai;       { y la variable de control }
     end
     else
       d := d + bi;       { Si no varía y, d sí lo hace según bi }
     x := x + xi;         { Incrementamos X como corresponda }
     PonPixel(x, y, color);          { Dibujamos el punto }
   until (x = x2);           { Se repite hasta alcanzar el final }
 end
 else                        { Si hay más salto según y que según x }
 begin                       { (más vertical), todo similar }
   ai := (dx - dy) * 2;
   bi := dx * 2;
   d  := bi - dy;
   repeat
     if (d >= 0) then
     begin
       x := x + xi;
       d := d + ai;
     end
     else
       d := d + bi;
     y := y + yi;
     PonPixel(x, y, color);
   until (y = y2);
 end;
end;


procedure linea(x1, y1, z1, x2, y2, z2 : real);
{ Convierte las coordenadas de real a entero y muestra centrado en
  pantalla.  La coordenada Z se desprecia en este ejemplo, pero se podría
  usar para dar una mayor sensación de perspectiva (cónica en vez de
  cilíndrica. }
begin
  lineaB(round(x1) + 160, round(y1) + 100, round(x2) + 160, round(y2) + 100,
    color);
end;


procedure dibujaImg;
{ Dibuja la imagen (ésta en concreto -> poco versátil ) }
begin
  linea(img[0].x, img[0].y, img[0].z, img[1].x, img[1].y, img[1].z);
  linea(img[1].x, img[1].y, img[1].z, img[2].x, img[2].y, img[2].z);
  linea(img[2].x, img[2].y, img[2].z, img[3].x, img[3].y, img[3].z);
  linea(img[3].x, img[3].y, img[3].z, img[0].x, img[0].y, img[0].z);

  linea(img[4].x, img[4].y, img[4].z, img[5].x, img[5].y, img[5].z);
  linea(img[5].x, img[5].y, img[5].z, img[6].x, img[6].y, img[6].z);
  linea(img[6].x, img[6].y, img[6].z, img[7].x, img[7].y, img[7].z);
  linea(img[7].x, img[7].y, img[7].z, img[4].x, img[4].y, img[4].z);

  linea(img[0].x, img[0].y, img[0].z, img[4].x, img[4].y, img[4].z);
  linea(img[1].x, img[1].y, img[1].z, img[5].x, img[5].y, img[5].z);
  linea(img[2].x, img[2].y, img[2].z, img[6].x, img[6].y, img[6].z);
  linea(img[3].x, img[3].y, img[3].z, img[7].x, img[7].y, img[7].z);

  linea(img[0].x, img[0].y, img[0].z, img[5].x, img[5].y, img[5].z);
  linea(img[1].x, img[1].y, img[1].z, img[4].x, img[4].y, img[4].z);
end;


procedure rotx;
{ Rotación en torno al eje X.  Un poco de álgebra lineal... }
var
  i : integer;
begin
  color := 0;
  dibujaImg;
  for i := 0 to 7 do
  begin
    img[i].x :=  img[i].x;
    img[i].y :=  img[i].y * cos(gradRad) + img[i].z * sin(gradRad);
    img[i].z := -img[i].y * sin(gradRad) + img[i].z * cos(gradRad);
  end;
  color := 15;
  dibujaImg;
end;


procedure roty;
{ Rotación en torno al eje Y }
var
  i : integer;
begin
  color := 0;
  dibujaImg;
  for i := 0 to 7 do
  begin
    img[i].x := img[i].x * cos(gradRad) - img[i].z * sin(gradRad);
    img[i].y := img[i].y;
    img[i].z := img[i].x * sin(gradRad) + img[i].z * cos(gradRad);
  end;
  color := 15;
  dibujaImg;
end;


procedure rotz;
{ Rotación en torno al eje Z }
var
  i : integer;
begin
  color := 0;
  dibujaImg;
  for i := 0 to 7 do
  begin
    img[i].x :=  img[i].x * cos(gradRad) + img[i].y * sin(gradRad);
    img[i].y := -img[i].x * sin(gradRad) + img[i].y * cos(gradRad);
    img[i].z :=  img[i].z;
  end;
  color := 15;
  dibujaImg;
end;


begin
  init;              { Inicializar }
  repeat
    retrace; rotx;   { Rotar y dibujar }
    retrace; roty;
    retrace; rotz;
  until (keypressed) { Hasta pulsar ESC }
    and (readkey = #27);
  asm
    mov ax, 3        { Modo texto }
    int $10
  end;
end.
Ahora vamos a ver otro ejemplo bastante más elaborado. Este está basado en un fuente de Bas van Gaalen.
- Rota una figura más complicada, que además es sólida (no deben verse las caras ocultas).
- Tiene un fondo que no se modifica.
- Al proyectar a 2 dimensiones da una cierta impresión de profundidad.
- Las caras están sombreadas. Aun así, este sombreado no es el más correcto, porque está basado en la distancia de cada plano al observador, de modo que dos planos contiguos se verán distintos (como pasa en la E que he cogido como ejemplo). El resultado sería más vistoso si el sombreado se basase en la inclinación de las caras (vector normal a cada plano).
{--------------------------}
{  Ejemplo en Pascal:      }
{                          }
{    Rota una E sólida 3D  }
{    ROTAE.PAS             }
{                          }
{  Este fuente procede de  }
{  CUPAS, curso de Pascal  }
{  por Nacho Cabanes       }
{                          }
{  Comprobado con:         }
{    - Turbo Pascal 7.0    }
{--------------------------}

{------------------------------------------------}
{  E rotada en 3D                                }
{  Por Nacho Cabanes, 96                         }
{                                                }
{  Basado (mucho) en 3DHEXASH, de Bas Van Gaalen }
{  (dominio público, recopilado en GFXFX)        }
{                                                }
{  Modificaciones sobre el original:             }
{  - Comentado, para que sea más fácil de seguir }
{  - Traducido a español  :-)                    }
{  - Cambiadas sentencias Inline por Asm         }
{  - Añadido un fondo al dibujo                  }
{  - La figura ahora es una E  :-)               }
{                                                }
{  Otras posibles mejoras:                       }
{  - Sombreado en función de la dirección de     }
{    cada cara, no de su distancia.              }
{------------------------------------------------}

program RotaE;
{$G+}

uses
  crt;
const
  divd=128;    { Para convertir de reales a enteros los senos/cosenos }
  dist=200;    { Distancia del observador }
  segVideo:word=$a000;  { Segmento de video: VGA modo gráfico }

  NumPuntos = 23;       { Numero de puntos }
  NumPlanos = 19;       { Número de caras }

  { Ahora van los puntos en sí }
  punto:array[0..NumPuntos,0..2] of integer=(
    (-40, 40, 20),( 40, 40, 20),( 40, 27, 20),(-27, 27, 20),  { E superior }
    (-27,  7, 20),( 27,  7, 20),( 27, -7, 20),(-27, -7, 20),
    (-27,-27, 20),( 40,-27, 20),( 40,-40, 20),(-40,-40, 20),
    (-40, 40,  0),( 40, 40,  0),( 40, 27,  0),(-27, 27,  0),  { E inferior }
    (-27,  7,  0),( 27,  7,  0),( 27, -7,  0),(-27, -7,  0),
    (-27,-27,  0),( 40,-27,  0),( 40,-40,  0),(-40,-40,  0));
  { Y ahora los 4 puntos que forman cada plano }
  plano:array[0..NumPlanos,0..3] of byte=(
    (0,3,8,11),(0,1,2,3),(4,5,6,7),(8,9,10,11),               { Superior }
    (12,15,20,23),(12,13,14,15),(16,17,18,19),(20,21,22,23),  { Inferior }
    (1,2,14,13),(2,3,15,14),(3,4,16,15),(4,5,17,16),          { Uniones }
    (6,7,19,18),(7,8,20,19),(8,9,21,20),(9,10,22,21),
    (10,11,23,22),(11,0,12,23),(0,1,13,12),(5,6,18,17)
    );

var
  { Coordenada "z" de cada plano, usada para sombrear: los más lejanos
    serán más oscuros }
  polyz:array[0..NumPlanos] of integer;
  pind:array[0..NumPlanos] of byte;
  { Tablas de senos y cosenos }
  ctab:array[0..255] of integer;
  stab:array[0..255] of integer;
  { La pantalla temporal en la que realmente se dibujará y el fondo }
  pantTemp, fondo:pointer;
  { Las direcciones en que empiezan ambos }
  segTemp, segFondo:word;
  { Límites de la pantalla, para no dibujar fuera }
  minx,miny,maxx,maxy:integer;

{ -------------------------------------------------------------------------- }

procedure retrace; assembler; asm
  { Sincroniza con el barrido de la VGA }
  mov dx,3dah; @vert1: in al,dx; test al,8; jz @vert1
  @vert2: in al,dx; test al,8; jnz @vert2; end;

procedure copia(src,dst:word); assembler; asm
  { Copia 64K de una dirección de memoria a otra }
  push ds; mov ax,[dst]; mov es,ax; mov ax,[src]; mov ds,ax
  xor si,si; xor di,di; mov cx,320*200/2; rep movsw; pop ds; end;

procedure setpal(c,r,g,b:byte); assembler; asm
  { Cambia un color de la paleta: fija la cantidad de
  rojo, verde y azul }
  mov dx,3c8h; mov al,[c]; out dx,al; inc dx; mov al,[r]
  out dx,al; mov al,[g]; out dx,al; mov al,[b]; out dx,al; end;

function coseno(i:byte):integer; begin coseno:=ctab[i]; end;
function seno(i:byte):integer; begin seno:=stab[i]; end;
  { Seno y coseno, a partir de tablas para mayor velocidad }

{ -------------------------------------------------------------------------- }

procedure horline(xb,xe,y:integer; c:byte); assembler;
{ Dibuja una línea horizontal a una cierta altura y con un color dado }
asm
  mov bx,xb
  mov cx,xe
  cmp bx,cx
  jb @skip
  xchg bx,cx
 @skip:
  inc cx
  sub cx,bx
  mov es,segTemp
  mov ax,y
  shl ax,6
  mov di,ax
  shl ax,2
  add di,ax
  add di,bx
  mov al,c
  shr cx,1
  jnc @skip2
  stosb
 @skip2:
  mov ah,al
  rep stosw
 @out:
end;

function MaxI(A,B:Integer):Integer; assembler;
{ Valor máximo de 2 dados }
asm
  mov ax, a
  mov bx, b
  cmp ax,bx
  jg @maxax
  xchg ax, bx
@maxax:
end;


function MinI(A,B:Integer):Integer; assembler;
{ Valor mínimo de 2 dados }
asm
  mov ax, a
  mov bx, b
  cmp ax,bx
  jl @minax
  xchg ax, bx
@minax:
end;


function EnRango(valor,min,max:integer):integer; assembler;
{ Comprueba si un valor está entre dos dados }
asm
  mov ax, valor
  mov bx, min
  mov cx, max
  cmp ax,bx
  jg @maxAx
  xchg ax, bx
@maxAx:
  cmp ax,cx
  jl @minAx
  xchg ax, cx
@minAx:
end;


procedure polygon( x1,y1, x2,y2, x3,y3, x4,y4 :integer; c:byte);
{ Dibuja un polígono, dados sus 4 vértices y el color }
{ Este sí es el original de Bas van Gaalen intacto...  O:-)  }
var pos:array[0..199,0..1] of integer;
  xdiv1,xdiv2,xdiv3,xdiv4:integer;
  ydiv1,ydiv2,ydiv3,ydiv4:integer;
  dir1,dir2,dir3,dir4:byte;
  ly,gy,y,tmp,paso:integer;
begin
  { Determinar punto más alto y más bajo y ventana vertical }
  ly:=MaxI(MinI(MinI(MinI(y1,y2),y3),y4),miny);
  gy:=MinI(MaxI(MaxI(MaxI(y1,y2),y3),y4),maxy);

  if ly>maxy then exit;
  if gy<miny then exit;

  { Ver dirección (-1=arriba, 1=abajo) y calcular constantes }
  dir1:=byte(y1<y2); xdiv1:=x2-x1; ydiv1:=y2-y1;
  dir2:=byte(y2<y3); xdiv2:=x3-x2; ydiv2:=y3-y2;
  dir3:=byte(y3<y4); xdiv3:=x4-x3; ydiv3:=y4-y3;
  dir4:=byte(y4<y1); xdiv4:=x1-x4; ydiv4:=y1-y4;

  y:=y1;
  paso:=dir1*2-1;
  if y1<>y2 then begin
    repeat
      if EnRango(y,ly,gy)=y then begin
        tmp:=xdiv1*(y-y1) div ydiv1+x1;
        pos[y,dir1]:=EnRango(tmp,minx,maxx);
      end;
      inc(y,paso);
    until y=y2+paso;
  end
  else begin
    if (y>=ly) and (y<=gy) then begin
      pos[y,dir1]:=EnRango(x1,minx,maxx);
    end;
  end;

  y:=y2;
  paso:=dir2*2-1;
  if y2<>y3 then begin
    repeat
      if EnRango(y,ly,gy)=y then begin
        tmp:=xdiv2*(y-y2) div ydiv2+x2;
        pos[y,dir2]:=EnRango(tmp,minx,maxx);
      end;
      inc(y,paso);
    until y=y3+paso;
  end
  else begin
    if (y>=ly) and (y<=gy) then begin
      pos[y,dir2]:=EnRango(x2,minx,maxx);
    end;
  end;

  y:=y3;
  paso:=dir3*2-1;
  if y3<>y4 then begin
    repeat
      if EnRango(y,ly,gy)=y then begin
        tmp:=xdiv3*(y-y3) div ydiv3+x3;
        pos[y,dir3]:=EnRango(tmp,minx,maxx);
      end;
      inc(y,paso);
    until y=y4+paso;
  end
  else begin
    if (y>=ly) and (y<=gy) then begin
      pos[y,dir3]:=EnRango(x3,minx,maxx);
    end;
  end;

  y:=y4;
  paso:=dir4*2-1;
  if y4<>y1 then begin
    repeat
      if EnRango(y,ly,gy)=y then begin
        tmp:=xdiv4*(y-y4) div ydiv4+x4;
        pos[y,dir4]:=EnRango(tmp,minx,maxx);
      end;
      inc(y,paso);
    until y=y1+paso;
  end
  else begin
    if (y>=ly) and (y<=gy) then begin
      pos[y,dir4]:=EnRango(x4,minx,maxx);
    end;
  end;

  for y:=ly to gy do horline(pos[y,0],pos[y,1],y,c);
end;

{ -------------------------------------------------------------------------- }

procedure quicksort(lo,hi:integer);
{ Una de las rutinas de ordenación más habituales.  Mucho mejor que
  burbuja (por ejemplo) cuando hay bastantes puntos }
procedure sort(l,r:integer);
var i,j,x,y:integer;
begin
  i:=l; j:=r; x:=polyz[(l+r) div 2];
  repeat
    while polyz[i]<x do inc(i);
    while x<polyz[j] do dec(j);
    if i<=j then begin
      y:=polyz[i]; polyz[i]:=polyz[j]; polyz[j]:=y;
      y:=pind[i]; pind[i]:=pind[j]; pind[j]:=y;
      inc(i); dec(j);
    end;
  until i>j;
  if l<j then sort(l,j);
  if i<r then sort(i,r);
end;

begin
  sort(lo,hi);
end;


{ -------------------------------------------------------------------------- }

procedure rotarImg;
{ Pues eso ;-) }
const
  xst=1; yst=2; zst=-3;
var
  xp,yp,z:array[0..NumPuntos] of integer;
  x,y,i,j,k: integer;
  n,Key,angx,angy,angz: byte;
begin
  angx:=0; angy:=0; angz:=0;
  fillchar(xp,sizeof(xp),0);
  fillchar(yp,sizeof(yp),0);
  repeat
    copia(segFondo,segTemp);
    for n:=0 to NumPuntos do begin
      { Proyectamos las coordenadas en 3D y luego a 2D }
      i:=(coseno(angy)*punto[n,0]-seno(angy)*punto[n,2]) div divd;
      j:=(coseno(angz)*punto[n,1]-seno(angz)*i) div divd;
      k:=(coseno(angy)*punto[n,2]+seno(angy)*punto[n,0]) div divd;
      x:=(coseno(angz)*i+seno(angz)*punto[n,1]) div divd;
      y:=(coseno(angx)*j+seno(angx)*k) div divd;
      z[n]:=(coseno(angx)*k-seno(angx)*j) div divd+coseno(angx) div 3;
      xp[n]:=160+seno(angx)+(-x*dist) div (z[n]-dist);
      yp[n]:=100+coseno(angx) div 2+(-y*dist) div (z[n]-dist);
    end;
    for n:=0 to NumPlanos do begin
      { Coordenada Z asignada al plano para sombrearlo: en función de la
        distancia al observador (media de las Z de las esquinas).  Está
        dividido entre 5 y no entre 4 para limitar un poco más el rango
        de valores que puede tomar }
      polyz[n]:=(z[plano[n,0]]+z[plano[n,1]]+z[plano[n,2]]+z[plano[n,3]])
        div 5;
      pind[n]:=n;
    end;
    quicksort(0,NumPlanos);    { Ordenamos los planos }
    for n:=0 to NumPlanos do
      { Dibujamos los planos por orden }
      polygon(xp[plano[pind[n],0]],yp[plano[pind[n],0]],
              xp[plano[pind[n],1]],yp[plano[pind[n],1]],
              xp[plano[pind[n],2]],yp[plano[pind[n],2]],
              xp[plano[pind[n],3]],yp[plano[pind[n],3]],polyz[n]+55);
    inc(angx,xst); inc(angy,yst); inc(angz,zst);
    copia(segTemp,segVideo);  { Ponemos en la pantalla visible }
  until keypressed;
end;

{ -------------------------------------------------------------------------- }

var i,j:word;
begin
  asm mov ax,13h; int 10h; end;            { Modo 320x200, 256 colores }
  for i:=0 to 255 do
    ctab[i]:=round(-cos(i*pi/128)*divd);   { Creo las tablas }
  for i:=0 to 255 do
    stab[i]:=round(sin(i*pi/128)*divd);
  minx:=0; miny:=0; maxx:=319; maxy:=199;  { Límites de la pantalla }

  getmem(pantTemp,64000);                  { Reservo la pantalla temporal }
  segTemp := seg(pantTemp^);
  getmem(fondo,64000);                     { Y el fondo }
  segFondo := seg(fondo^);

  { Dibujo el fondo }
  for i:=0 to 319 do
    for j:=0 to 199 do
      mem[segFondo:j*320+i]:=(i+j) mod 102 +152;
  for i:=0 to 255 do stab[i]:=round(sin(i*pi/128)*divd);
  { Colores del rótulo }
  for i:=1 to 150 do setpal(i,30+i div 6,20+i div 7,10+i div 7);
  { Colores del fondo }
  for i:=151 to 255 do setpal(i,i div 7, i div 7,i div 5);

  rotarImg;

  { Se acabó -> liberamos la memoria reservada }
  freemem(pantTemp,64000);
  freemem(fondo,64000);

  { Y volvemos a modo texto }
  textmode(lastmode);
end.
Venga, a experimentar... }:-)